Get started with web scraping in python using selenium and beautifulsoup
For this post, we will not focused on any specific web site to perform scraping, what we will do is to analyzed the main instructions required to start doing web scraping in any site. First of all, let me share some important links that you can check to master your skills in web scraping.
- Documentation for BeautifulSoup
- Documentation for Selenium
Installation of required libraries
First, we need to install the required packages for web scraping:
In the documentation you can find that $lookup operator inside aggregation operators is refered as the function to perform a left outer join between collections in the same database.
{
    pip install selenium
    pip install beautifulsoup4
    pip install requests
}
Selenium is basically a library that allows us to trigger a test mode web browser from the python code and from this script you can get all the data loaded in the web browser. For static websites, we only need the Requests library which allows to perfom HTTP requests from python code, since the website is static all the data is loaded with the HTTP request procedure. However, for dynamic sites (websites that uses javascript to load the data) this is not enough (and most of the web is made with dinamic data), for this cases we need some other libraries in order to obtain the data loaded by javascript, one of those tools is Selenium.
Selenium library basically allows to triger a web browser in order to get all the dynamic data and then we can get the HTML to perform the scrape. If we only use Requests library for dynamic sites, then the data retrieve by Javascript will be missing since the HTTP request doesnt trigger the javascript function that populates the data, javascript is triger by the web browser.
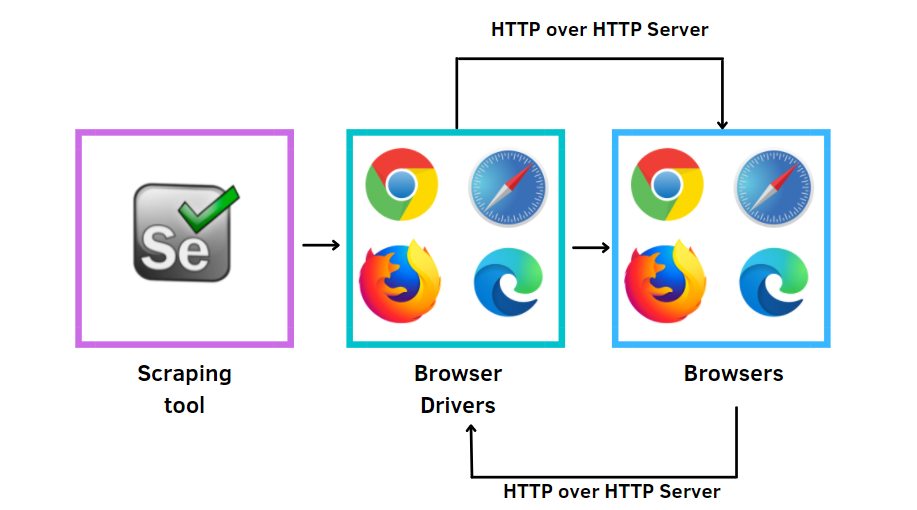
In order to have selenium working properly it is required to install web browser drivers (Chrome, Firefox or Edge). With following package, we can manage the web drivers easier:
{
    pip install webdriver-manager
}
Create Random User Agent
Once the script ask for a website, the request includes some headers data which is recommended to rotate in order to avoid being banned by the web server.
To get different user agents you can check in this website
As example we gathered some user agent and saved in a list to be selected randomly, during the request.
    import random
    user_agent_list = [
        'Mozilla/5.0 (Windows NT 10.0; Win64; x64) AppleWebKit/537.36 (KHTML, like Gecko) Chrome/99.0.4844.51 Safari/537.36',
        'Mozilla/5.0 (Macintosh; Intel Mac OS X 10_15_6) AppleWebKit/605.1.15 (KHTML, like Gecko) Version/14.0.3 Safari/605.1.15',
        'Mozilla/5.0 (Windows NT 10.0; Win64; x64) AppleWebKit/537.36 (KHTML, like Gecko) Chrome/94.0.4606.81 Safari/537.36',
        'Mozilla/5.0 (Windows NT 10.0; Win64; x64) AppleWebKit/537.36 (KHTML, like Gecko) Chrome/51.0.2704.79 Safari/537.36 Edge/14.14393',
        'Mozilla/5.0 (Windows; U; Windows NT 5.1; en-US; rv:1.7.5) Gecko/20041107 Firefox/1.0',
        'Mozilla/5.0 (Macintosh; Intel Mac OS X 10_10; rv:33.0) Gecko/20100101 Firefox/33.0',
        'Mozilla/5.0 (X11; Ubuntu; Linux i686; rv:24.0) Gecko/20100101 Firefox/24.0',
        'Mozilla/5.0 (X11; Linux x86_64) AppleWebKit/537.36 (KHTML, like Gecko) Chrome/80.0.3987.87 Safari/537.36',
        'Opera/9.80 (Linux armv7l) Presto/2.12.407 Version/12.51 , D50u-D1-UHD/V1.5.16-UHD (Vizio, D50u-D1, Wireless)',
        'Mozilla/5.0 (X11; Ubuntu; Linux x86_64; rv:21.0) Gecko/20100101 Firefox/21.0',
        'Mozilla/5.0 (X11; Linux x86_64) AppleWebKit/537.36 (KHTML, like Gecko) SamsungBrowser/16.0 Chrome/92.0.4515.166 Safari/537.36'
    ]
    def get_random_agent():
        return user_agent_list[randrange(len(user_agent_list))]
It is strongly suggested to also rotate your ip address to avoid being banned by the web server during intense scraping.
Web scraping static data
For static data, we can use the Requests library to perform HTTP GET/POST requests.
response = requests.get(URL, headers={'User-Agent': get_random_agent()})
Once the data is collected, this is saved as a string so we need to create a BeautifulSoup object in order to provide some structure and being able to navigate the HTML tree.
    from bs4 import BeautifulSoup
    html_indexed_data = BeautifulSoup(response.text, 'html.parser')
The second parameter is the parser, which is like a guide on how to parse the string data into an structure format. The most common parsers are: html.parser and lxml.
Now, the data is stored in a BeautifulSoup object, ready to extract the value information required.
Web scraping dynamic data
Now, if after getting the HTTP GET request the data is not shown, it is probably because of the data is dynamically loaded after the browser executtes some javascript code. In this case we use the BeautifulSoup library to handle it.
    from selenium import webdriver
    from webdriver_manager.chrome import ChromeDriverManager
    from bs4 import BeautifulSoup
    driver = webdriver.Chrome(ChromeDriverManager().install())
    driver.get(URL)
    html_data = driver.page_source
    html_indexed_data = BeautifulSoup(html_data, 'html.parser')
Now we can analyze the data stored in the BeautifulSoup object.
Access data in Beautiful Soup
Let’s check some of the most popular functions to access data in a HTML file (loaded as a BeautifulSoup Object).
Next code, allowsto access all div tags with classes “class_1 class_2 class_3”. Important to notice, the class must follow this order, otherwise data will not be found by the function.
div_data = html_indexed_data.find_all("div", class_="class_1 class_2 class_3")
Since we used the funciont find_all, we should loop through the div_data variable to get all the div found. Here we would like to save all the href value in anchor tags inside articles tags inside the div_data collected in the previous code.
    anchorsHrefs = []
    for div in div_data:
        anchor = div.find('article').find("a", href=True)
        anchorsHrefs.append(anchor)
If some data is inside <script></script> tags, we could load all the information as a dict object from JSON. This way would be much easier to get specific information.
In the next case let’s assume we require some data inside <script id="script_data"></script> so we need to use the function find and specify the id value of tag. At the end we set ‘string’ in order to get the internal data of the tags as string.
script_json_tag_data = html_indexed_data.find(id="script_data").string
In our case, the data inside the <script></script> tags is json format, so we can load it directly to python as a dict object.
    import json
    script_tag_data_dict = json.loads(script_json_tag_data)
Now, we can access this information with key values of the json object, like:
    script_tag_data_dict['key_1']
    script_tag_data_dict['key_2']['key_x']
Bonus Tip: Saved HTML data scraped to an S3 Bucket
It could be a good practice to store the HTML raw data collected from the external server in an S3 bucket, in case we need to access the raw data in the future. For this case, you can find some code snipets to save string data in an HTML file.
First, it is necessary to install the python library used to communicate with AWS.
{
    pip install boto3
}
In AWS, you need to create an user with enough permissions to write and read files in S3. In this link you can learn how to create the IAM user and also an S3 bucket.
    import boto3
    client = boto3.client(
            's3',
            aws_access_key_id='YOUR_AWS_ACCESS_KEY',
            aws_secret_access_key='YOUR_AWS_SECRET_KEY'
        )
Once you have your credentials and the bucket created, you can start uploading files into S3.
    key = 'path/to/save/object/filename.html'
    client.put_object(Body=txt_obj, Bucket=self.bucket, Key=key)
The key value includes the html extension. The txt_obj is variable that contains the html code as string.